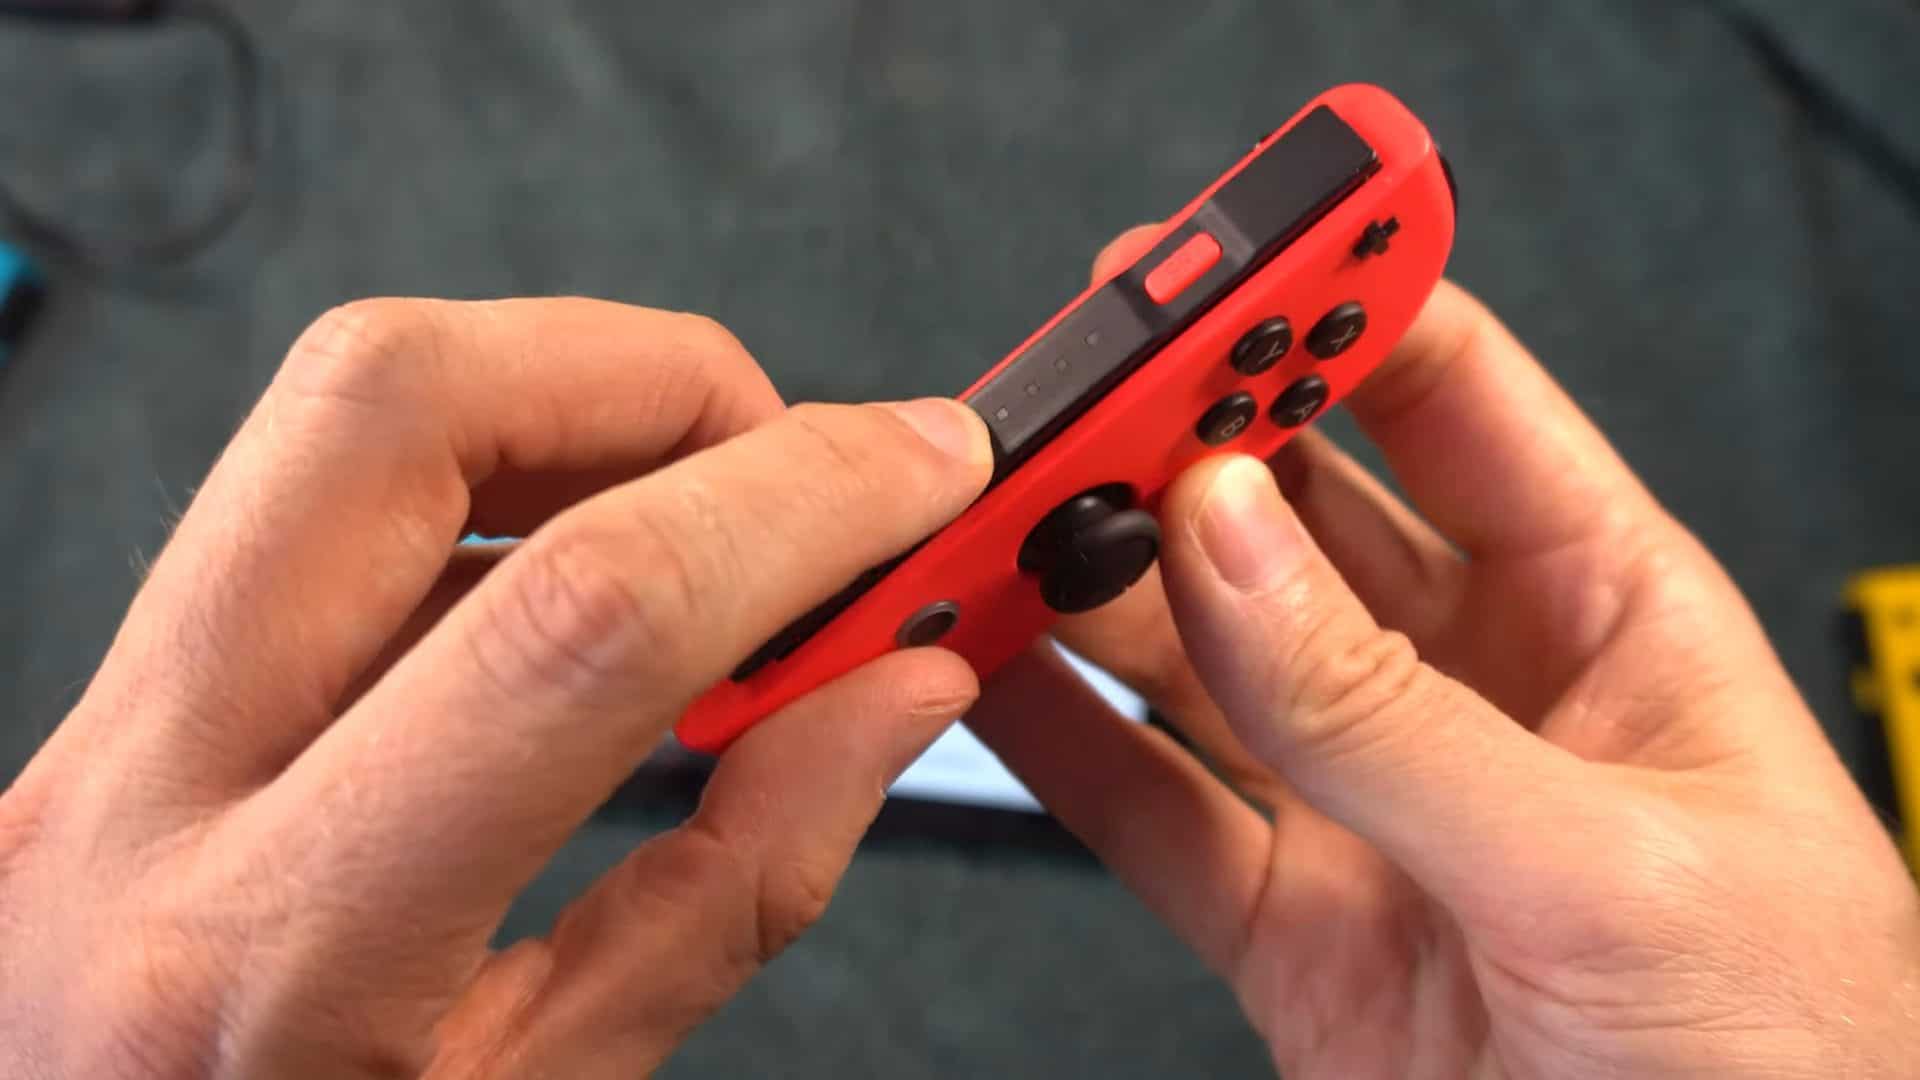
You can be sure that you’re not alone if your Nintendo Switch controller is drifting; at this point, it has happened to practically every Switch user. How frequently has Link been crushed? How many important shots has an Inkling missed? And it’s all because of the faulty Joy-Cons.
Players of the Switch have given the controllers’ tendency to start moving characters in the game without human input over time the nickname “Joy-Con drift.” The Nintendo Switch is a fantastic device with a ton of fun games, but even the best Switch titles may be ruined by a loose Joy-Con. When using your Switch to play games, there are solutions to prevent this issue.
How To Fix Nintendo Switch Controller Drift
This is a fast-paced but comprehensive guide to fixing Nintendo Switch Controller Drift, aka Joy-Con Drift. It shows 12 methods for you to try, each with increasing difficulty.
You should start with method 1, and if that doesn’t work, go to method two and so forth. Work your way through the list until your problem is solved or you reach the end of your comfort level. Note that some methods build on previous ones, so I advise you don’t skip around to different sections.
Method 1: Run Updates
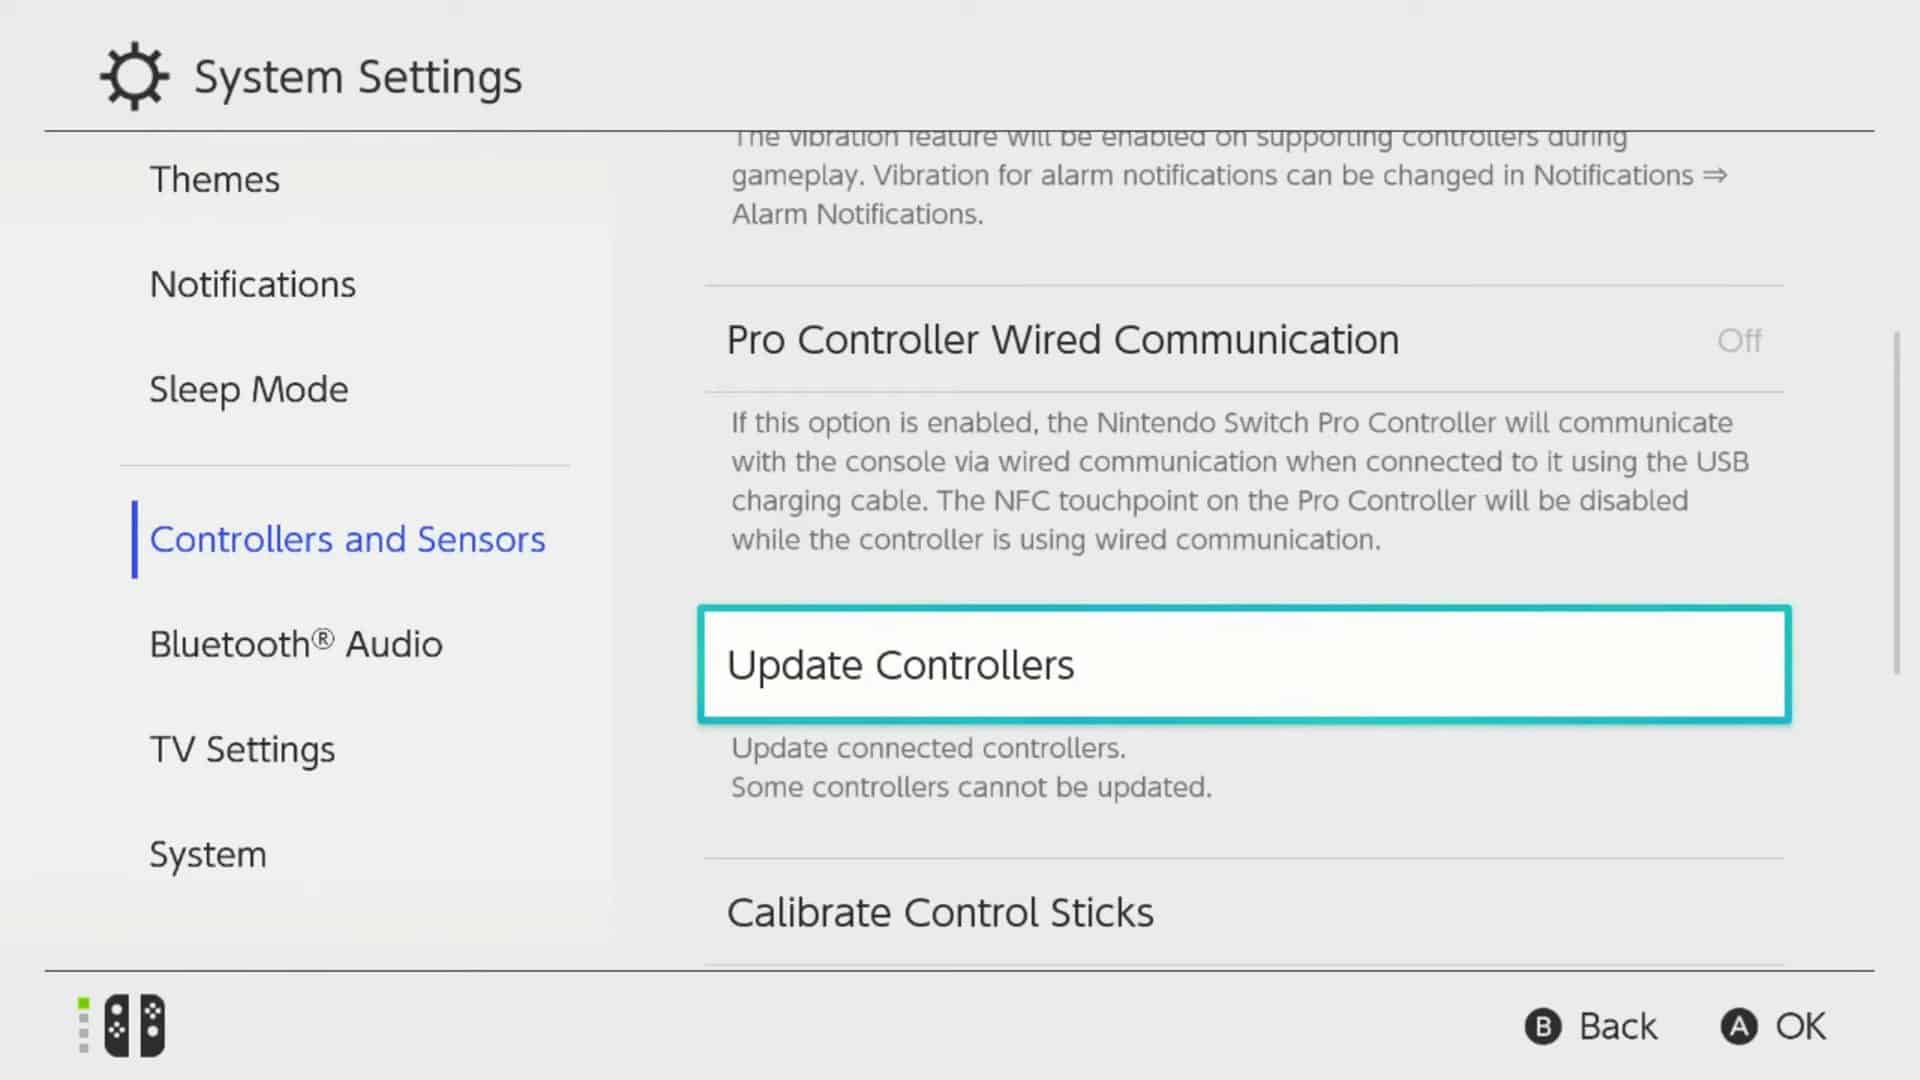
The first thing to try is to run updates on your Nintendo Switch Controller. It’s a long shot, but it’s easy to do. First, make sure you have the latest system update installed, then just follow this menu path to run the controller updates: System Settings>Controllers and Sensors>Update Controllers.
Method 2: Re-Sync
The next thing to fix Nintendo Switch Controller Drift is to resync the Joy-Con. Another long shot: put the Switch in sleep mode, wake it up by hitting the power button, reset the Joy-Con by pressing the little, circular Sync button once, and then click any other button on the controller.
Method 3: Calibrate The Joy-Con
You probably already did this, but use the menu path shown to calibrate your Joy-Con: Settings>Controllers and Sensors>Calibrate Control Sticks. If you attempt any of the upcoming methods, you should also consider recalibrating after each one.
Method 4: Tap And Open Clean
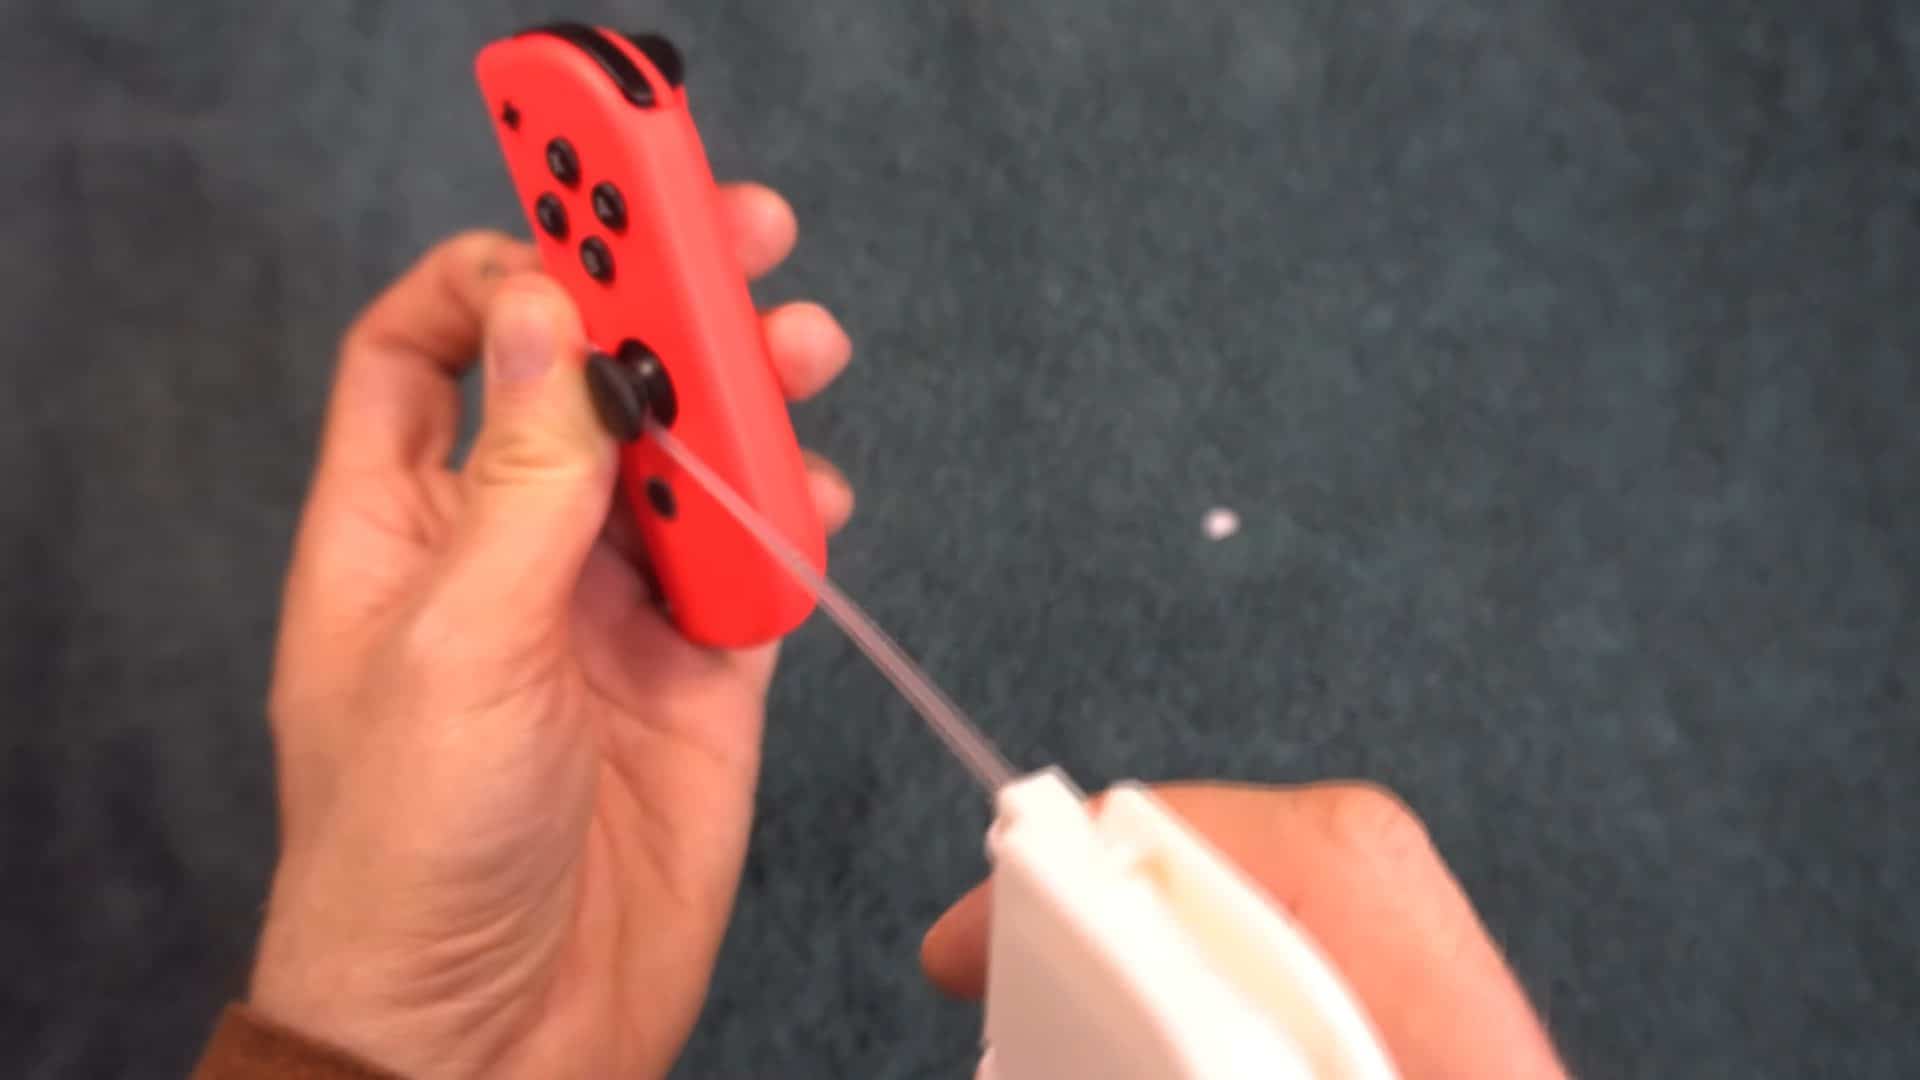
Sometimes the Nintendo Switch Controller Drift is caused by dirt getting underneath the stick, so dislodging the dirt can help. There’s a rubbery hood at the bottom of the stick that covers an opening. You need to flip the hood up and, if possible, find a way to keep it up.
You can use a broken paper clip, a twister seal, or a roll of paper. Don’t experiment too much because the hood is a bit fragile, and if you move it around repeatedly, it may tear off.
Once you have that hole opened, turn the controller around and tap it on the back for three minutes. Hopefully, this will cause debris to fall out. If you hold it above a bright surface, you may be able to see something come out.
Method 5: Alcohol Clean
Another way to fix Nintendo Switch Controller Drift by attacking dirt is to open the hood as shown in method 4, but this time take some isopropyl alcohol and a flattened q-tip and clean the area underneath.
I suggest you make sure a few drops get down inside the controller, move the stick around, then retest. As an alternative to alcohol, you can use a little bit of electronic contact cleaner. Don’t use regular wd-40 or any other types of chemicals that are not labeled as contact cleaners.
Method 6: Air Clean
Yet another way to clean it is to blow air inside the stick. You can use a straw with a flattened end and just insert it under the hood and blow. You can do the same with canned air; just make sure you don’t tilt the can, or it’ll spray chemicals inside. This is a very common mistake that people make with canned air, and you need to hold it upright.
You can also pin the hood open and use a hair dryer on the cold setting, don’t blow heat into it. If you use the straw method, it’s a good idea to also use the hair dryer afterward to evaporate any saliva that may have accumulated inside the stick.
Method 7: Vacuum Clean
Open the hood as shown in Method 4 and apply suction with a vacuum cleaner nozzle, don’t use full suction. If there’s a ring on the nozzle, move it so the holes are open, which will weaken the suction. You just don’t want to get too carried away, and you may just end up sucking wires out of your controller. To take it a step further, incorporate some tapping in between the suctioning.
Method 8: Nintendo Repair
This is the last method you can try that doesn’t involve taking the controller apart. If you take it apart, you may void your warranty, so Method 8 is to send it to Nintendo to be repaired. They have a repair website for the US and Canada, Joyconrepair.nintendo.com, which will allow you to mail them your Joy-Con.
According to sources, they will fix it for free regardless of the warranty status but double-check with them. Something to keep in mind is that they may end up sending back a different Joy-Con than the one you sent in.
Method 9: Cardboard
Now we need to go inside the Nintendo Switch Controller and insert some cardboard. Disclaimer: Taking apart your joy-con is risky. You may break it or make the problem worse. I’m going to do my best to give you details that will reduce that risk, but I can’t lower it to zero. Leaving the battery connected and charged while you go inside the controller can short out the electronics.
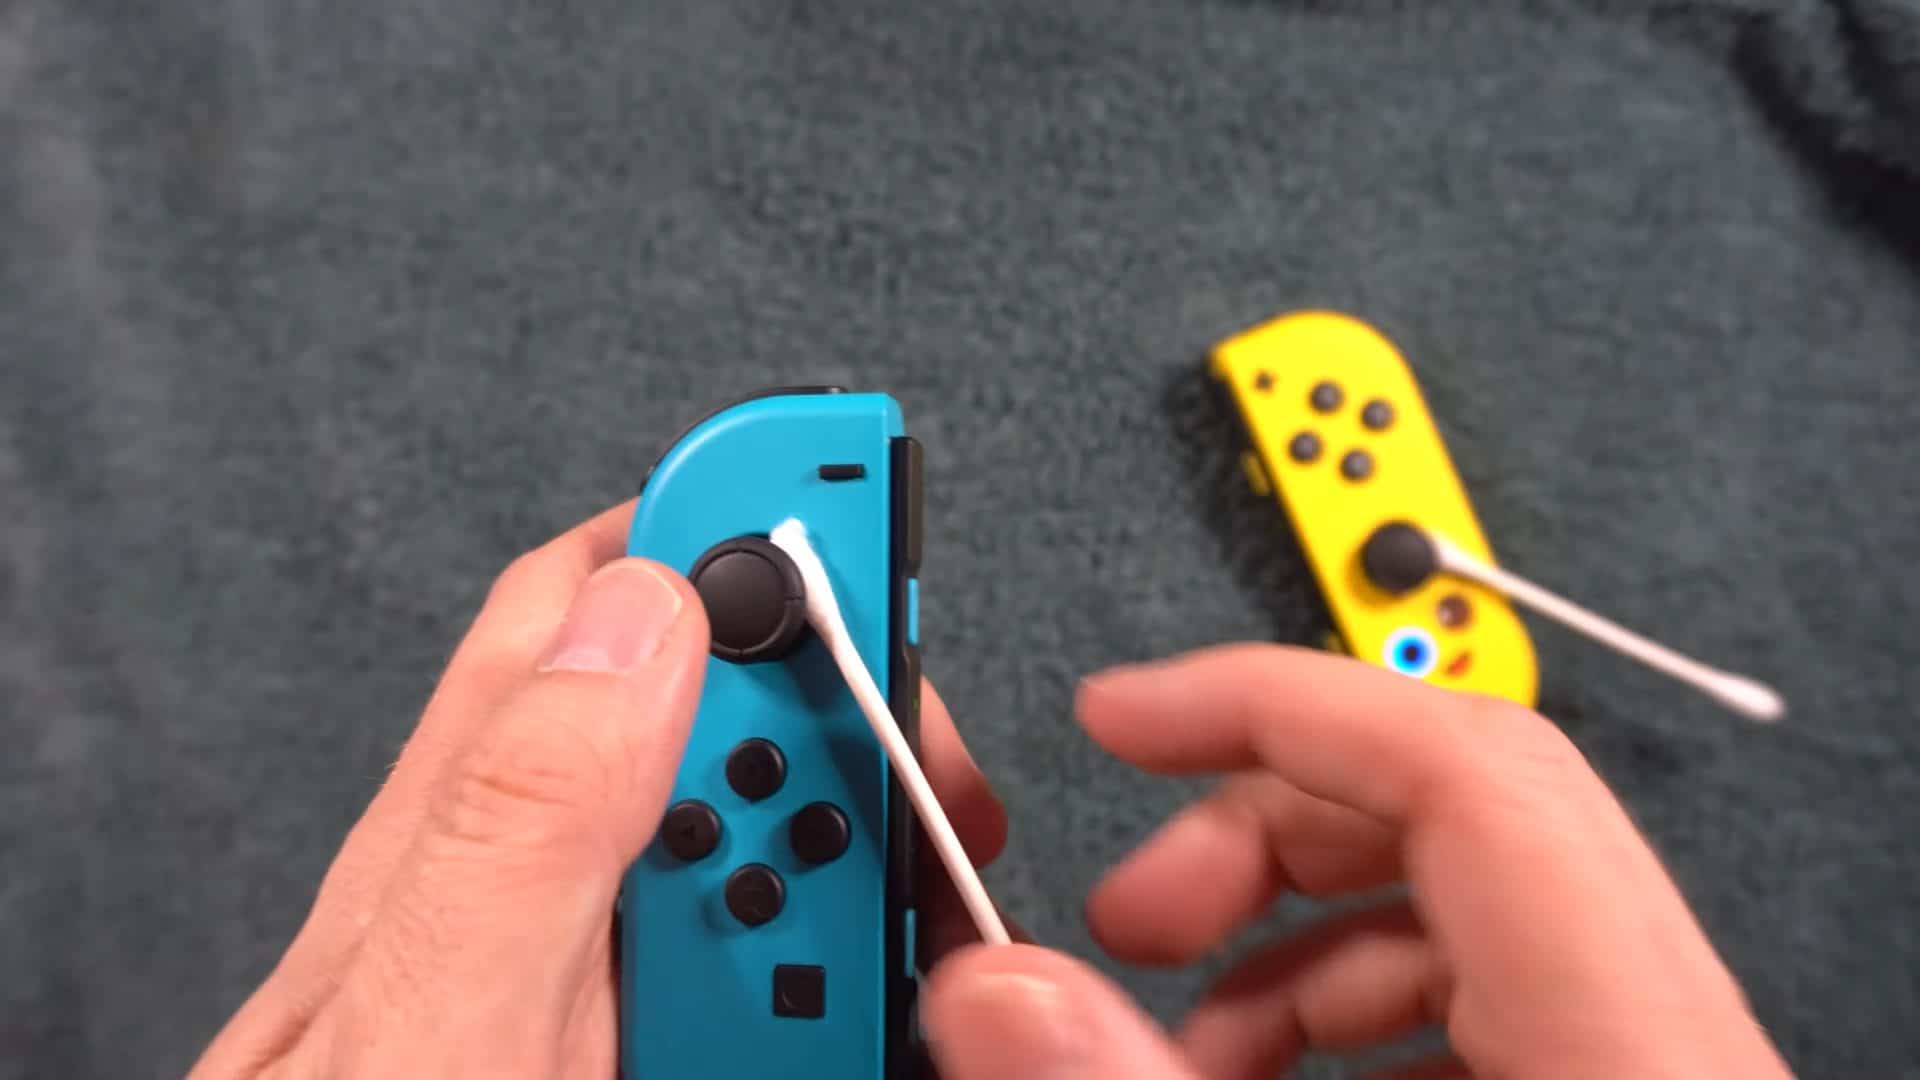
The safest way to proceed is to drain the battery; first, this will also allow you to avoid disconnecting the battery later in the process, which is good because the battery connector breaks easily. To drain, make sure the Joy-Con isn’t mechanically connected to the side of the Switch.
Find a spot in the game that’s safe for your character to move and stuff a q-tip underneath the stick to make the character move or the camera move or something like that, and you can also try doing this on a game menu or something.
This would take a while, and if you’re really impatient, you can pair your Joy-Con to a pc and go to the website called gamepad tester and click the vibration button over and over again. You can also download a free mouse auto clicker and have it automatically click the vibrate button.
Note: This may cause long-term damage to the motor, so you may want to space out the auto clicks to be two or three seconds apart. Another Note: There are internal differences in the left and right Joy-Con. I will point out the differences as I instruct you throughout the tutorial, so once again z
I advise against skipping around the tutorial. Start by taking off the wrist strap if it’s still on there. Then find a tri-wing screwdriver. You can easily find them on amazon. Just look up the term switch tri-wing screwdriver. Note: You will only need this for the outside screws. The one inside the controller takes a more standard type of screwdriver.
Before turning the screws, you need to loosen them up a little bit because they’re really tight, and you don’t want to strip them. Drop one drop of water on each one, and as it’s soaking, tap each screw. Also, clean out any dirt you see around the screw. After five minutes, take a q-tip and swab out the excess water. This will further clean the area. Once it’s dry, proceed with removing the four screws.
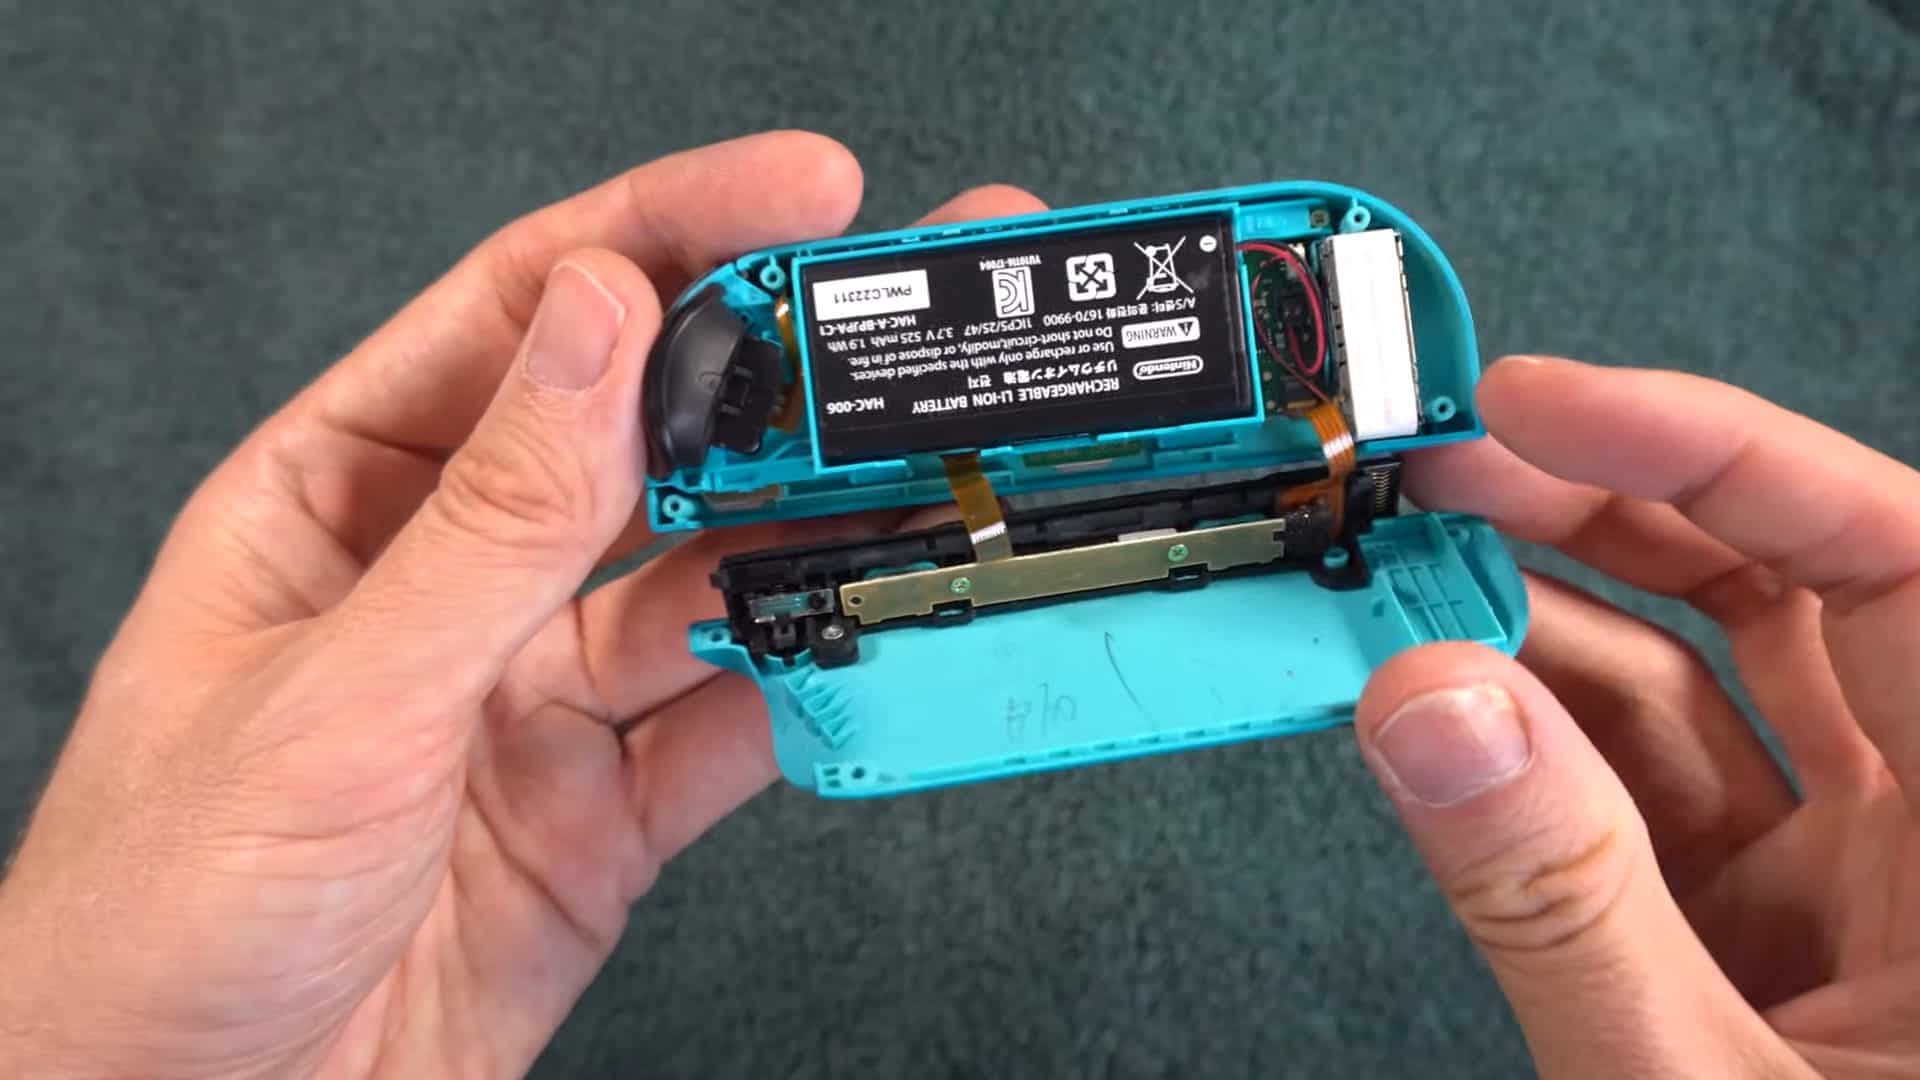
Separate the two halves carefully, and a plastic knife can be used. Some people may be able to separate with just their hands. When you get enough separation, carefully open it like a book, with the spine in the book being the side with the metal that hooks onto the Switch.
We do this because there are some ribbons connecting the two halves. So far, there are no differences in this process between the right and left Joy-Con.
Next, pry the battery out. It’s usually held in with some sticky tape, so at first, it seems like it’s not gonna budge. If you drained the battery, just lay it off to the side still connected. If it’s not drained, you can disconnect it if you want, but many people end up breaking the connector in the process, and they ruin their controller. So I’m not even going to show you how to disconnect it.
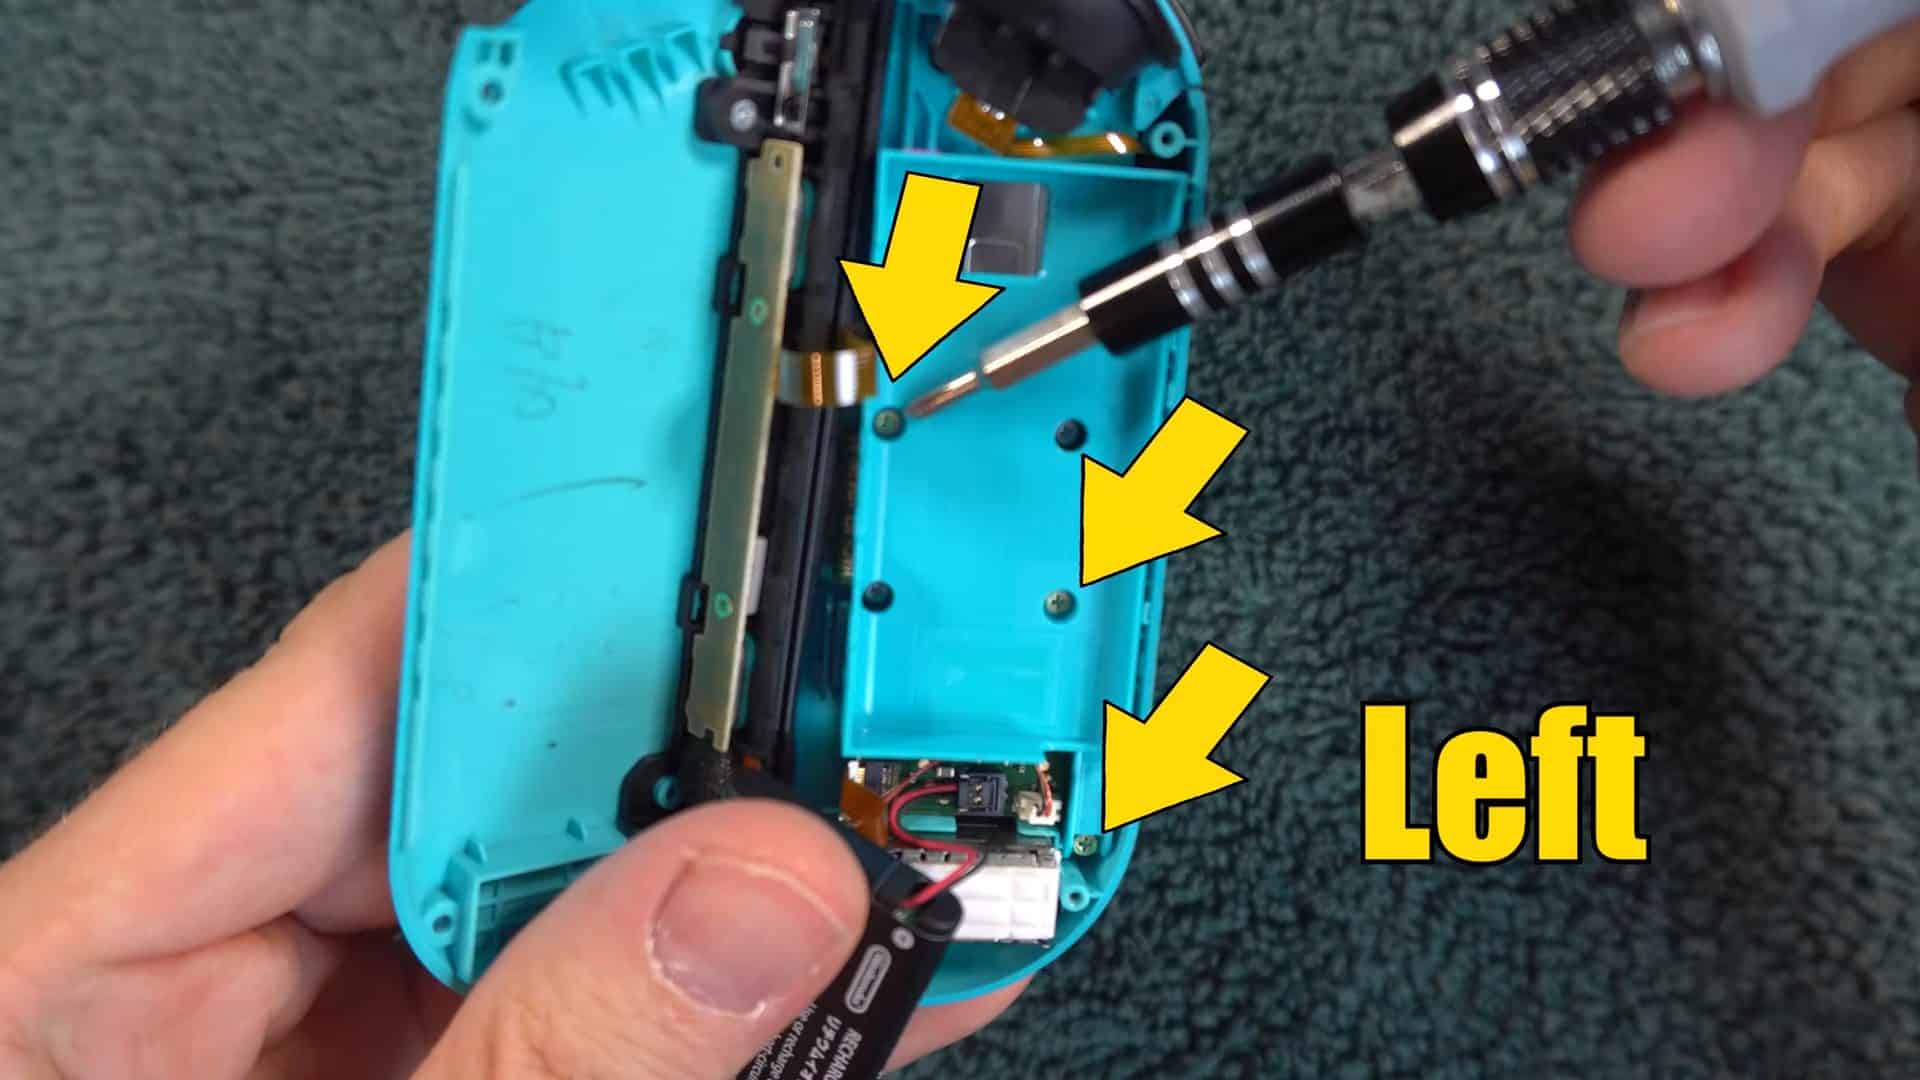
If you did not drain or disconnect, you could still move forward with this process, but you run the risk of shorting something out since there’s still electricity in the battery. Next, you’ll need to remove some more screws using a tiny Phillips screwdriver. This is where there are some differences between the left and right Joy-Con, so please pay attention.
For the left Joy-Con, you will only take three of the five screws out that you see in the image. Notice two screws are deeper than the others, and those are the ones you want to leave in place. Just remove the other three. They are loose, so there’s no need to do the water, and the tapping like you did earlier.
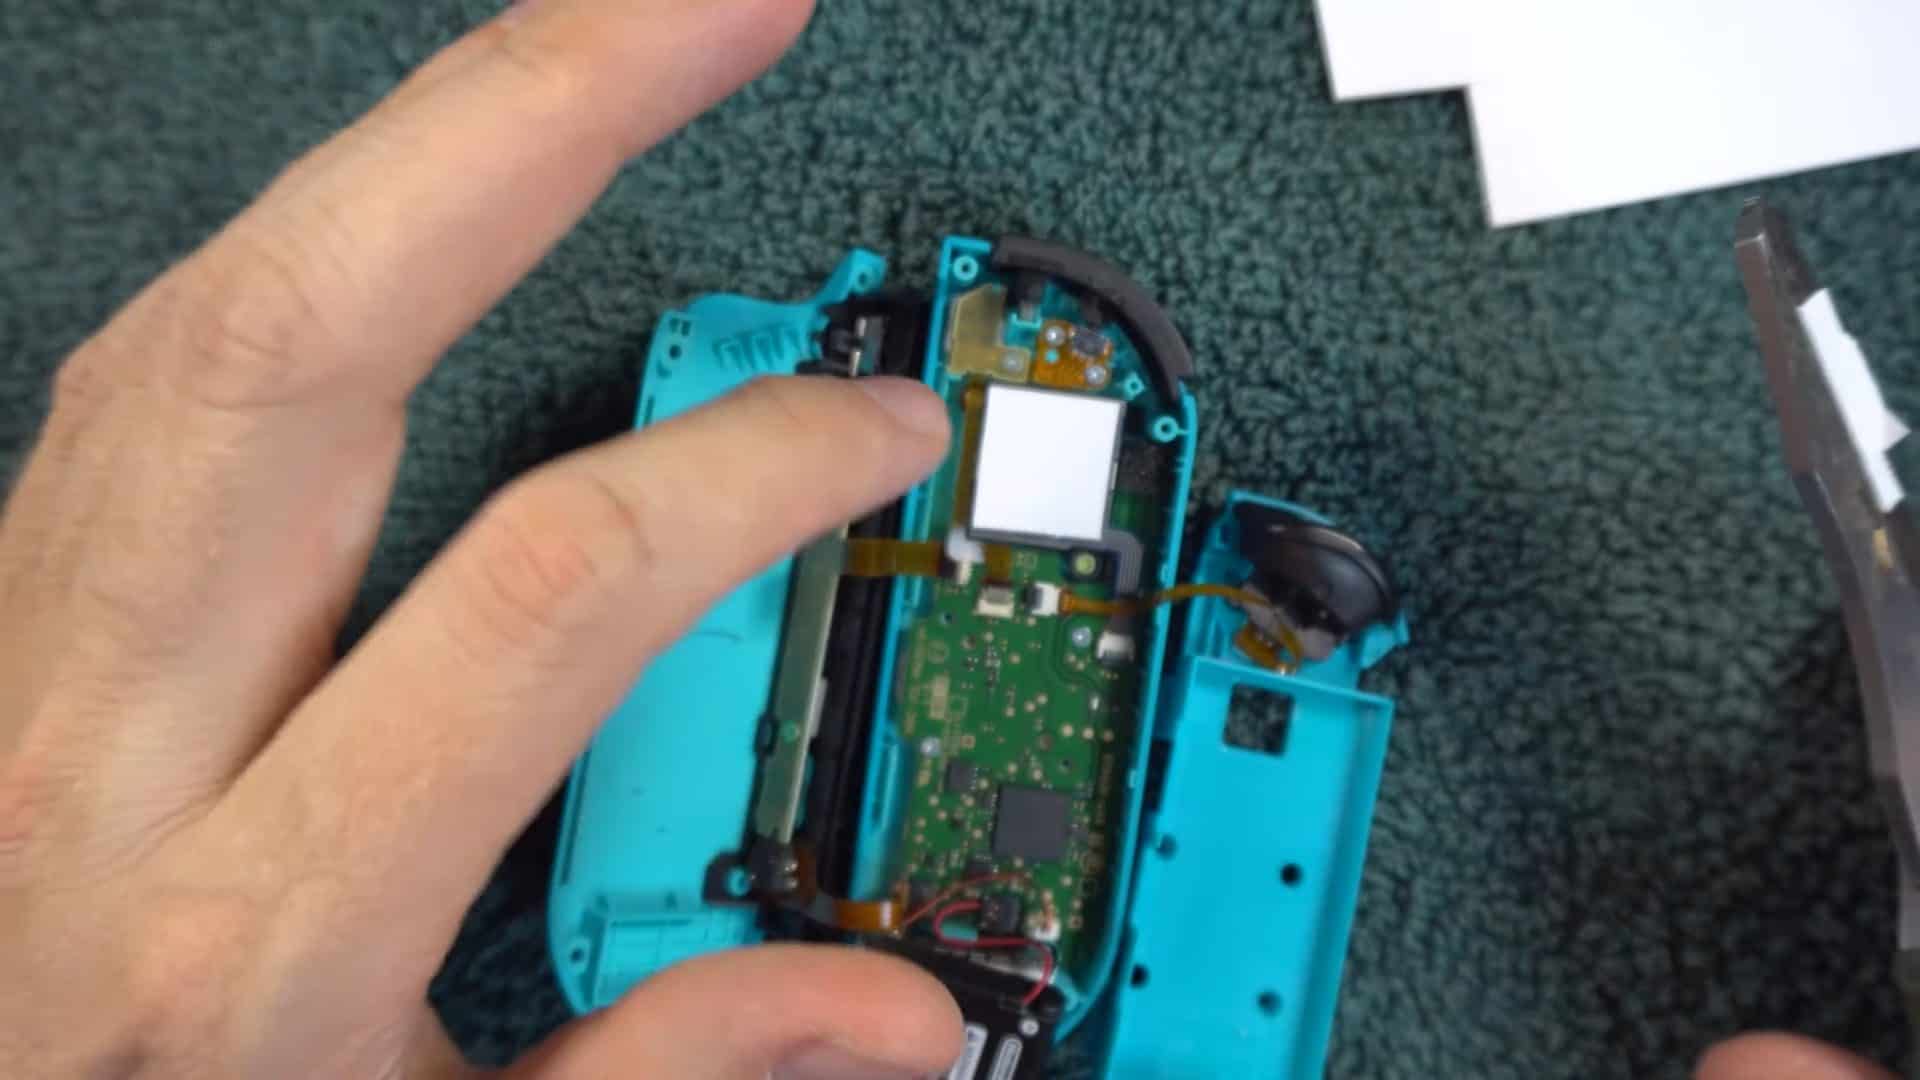
For the right Joy-Con, you’ll first need to remove the NFC chip tucked in there and just let it hang. Remove the three screws located in the corners. The rest of this disassembly is the same for the left and right joy-cons.
Pry the plastic layer up and turn it to the side slowly like a book since it’s connected by a small ribbon. Now you’re all the way in. If the trigger button fell out, put it back in. Make sure the spring is inside this tiny compartment.
You may also want to clean around that button because there tends to be some dirt there. Be prepared because this button will likely fall out multiple times as you’re working with this tutorial.
Then you see a silver square which is the back of the stick, and we’re going to lay cardboard across it. This will cause extra pressure to be applied to the stick, which for some people, will resolve their drift.
I’m cutting a square out of a business card, and I made it slightly smaller than the square I’m laying it on top of. Your cardboard needs to be pretty thin, so if you don’t have a business card, try to find a food box in your cabinet or something.
Nintendo is aware of this resolution, and on newer controllers, they have put their own padding in that functions the same way as the cardboard. If you see this padding, you need to use really thin cardboard. In fact, you may just want to add two layers of paper.
If Nintendo has the padding there and you lay on thick cardboard, the controller is going to be too fat to put back together. There’s no need to glue or tape it down, you’re just going to close things up, and that’s going to keep the cardboard in place.
The plastic layer may have gotten twisted around, so make sure the ribbon is going out through the gap that’s shaped like a triangle. Lay the piece back into place and put the screws back in, and put the battery back into place.
For the left Joy-Con, you’ll need to put the NFC chip back inside the holder that’s next to the battery. Its little wires need to be tucked into the groove. From here, everything should go back together. Test and see if it worked.
Method 10: Replace
If the cardboard didn’t work, the next step would be to go back in and just replace the stick. Replacements are easy to find on Amazon. Disclaimer: This is more complex than the last method. It involves disconnecting some tiny, fragile ribbon cable. I’m going to give you as many pointers as possible to lower the risk for you, but the risk will never be zeroed.
Disassemble the Joy-Con as described in method nine all the way until you can take the cardboard off. From here on, the process will be different for the left and right Joy-Con.
Left Joy-Con
For the left, you’ll need to remove the two screws holding the stick. One of those is under a ribbon, so you’ll need to disconnect that ribbon. Look carefully to see if there’s a little gate on the connector that holds that ribbon in. If so, flick it into the up position.
Some people claim they don’t have this gate or the gate is already up. To make sure, I suggest getting your phone out and using the camera to magnify the area and see if you have the gate. If the gate isn’t there, just keep proceeding with this process.
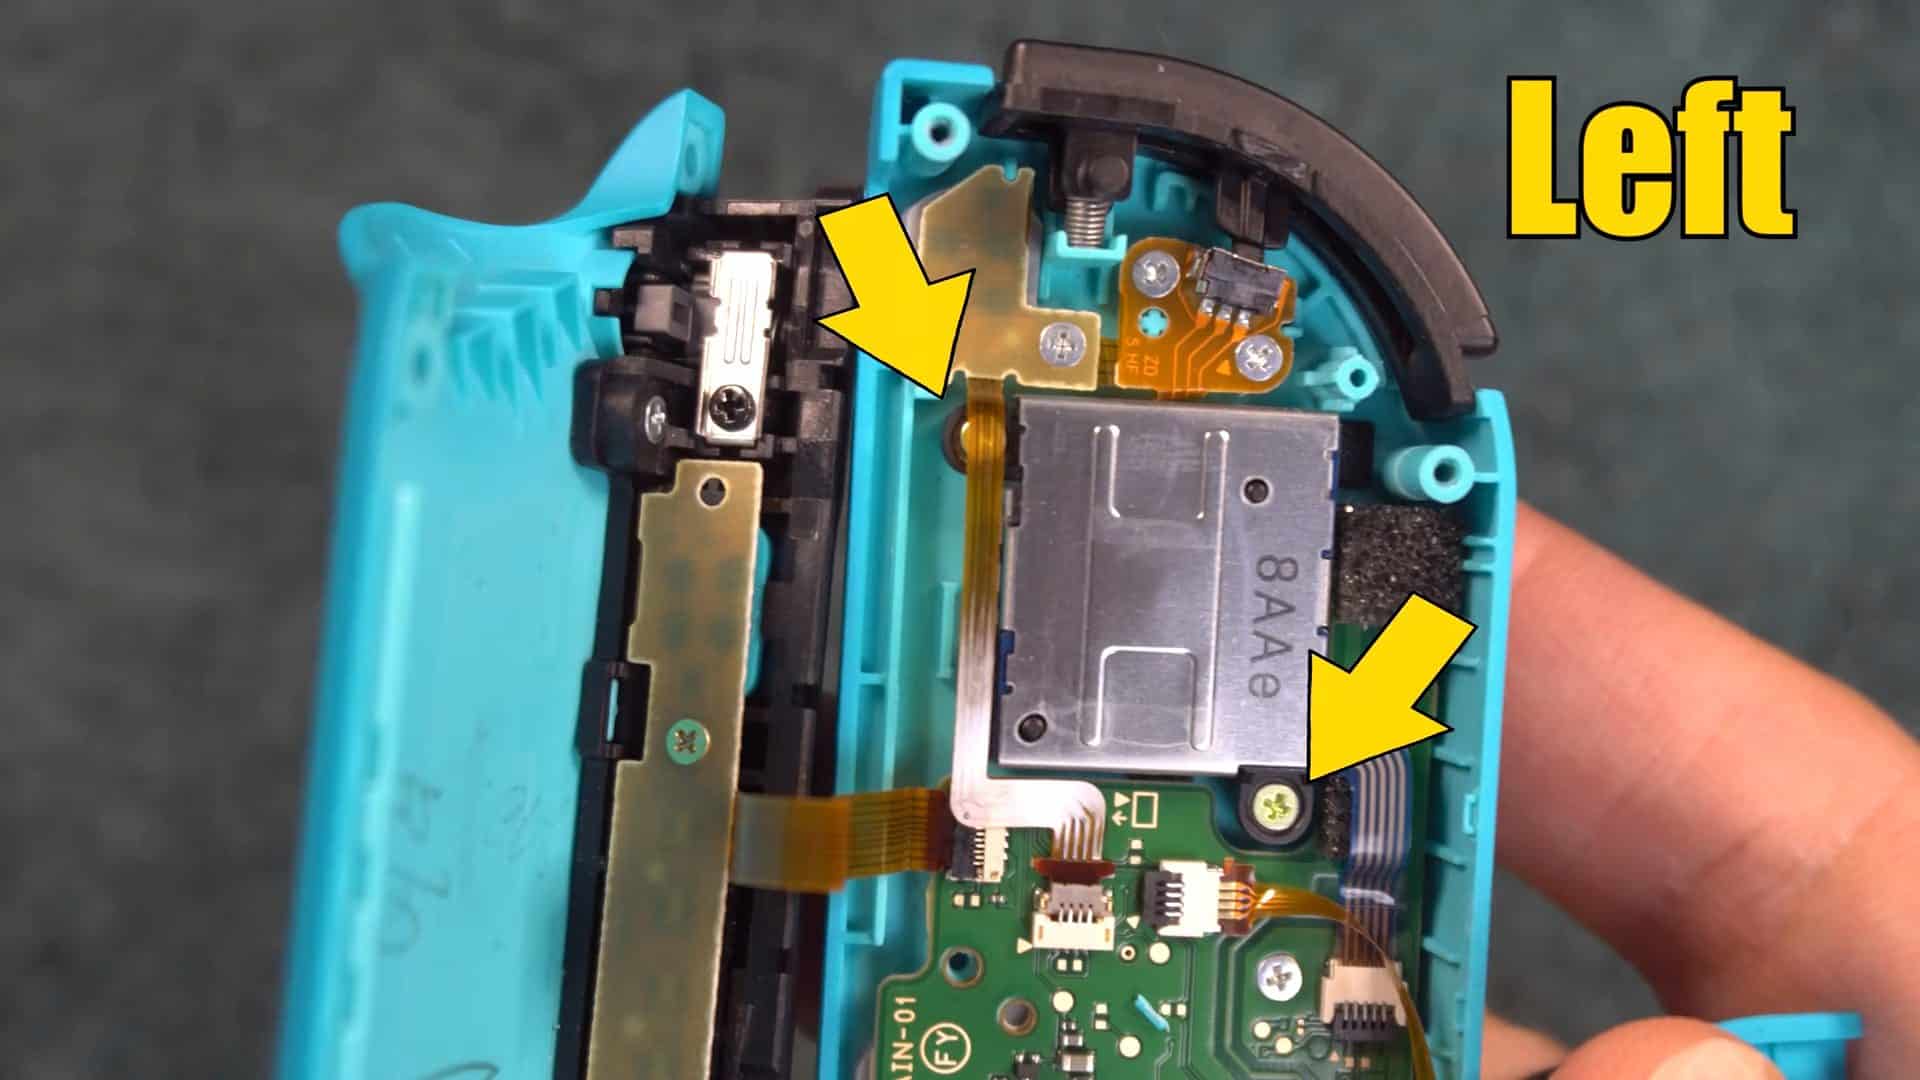
I’m still talking about the left Joy-Con here. Now you need to disconnect another ribbon, the one leading to the stick itself. For this one, the gate is on the other side of the connector. But it functions the same way. If you do have this gate, flick it into the up position. Pull both ribbons out of the connectors. If you don’t have a gate, I think you can just pull the ribbon out but please proceed with caution.
Right Joy-Con
For the right Joy-Con, you only need to disconnect one ribbon, the one leading to the stick. Do it the same way as I just described for the left Joy-Con. Remove the two screws holding the stick, and push the stick from beneath until it comes out. There’s this material around the hole. Make sure it stays in place, and it’s a good idea to clean the area; you should see some dirt in there.
Put the new stick in and put the screws in place. Put the ribbons back in and take your time doing it; maybe find someone with small fingers. It’s hard to get the end of the ribbons into the little slits but just keep doing slight movements until it happens. Once again, you can use your camera phone to magnify the area and get a better look. Close the gates (if you have them) and reassemble the controller, as I showed in Method 9.
Method 11: Inside Cleaning
This is a high-risk method and is really only for those who don’t want to order a replacement stick. It involves going deep inside the existing stick and cleaning it. You may break the parts that are inside the stick, which happens to be one time out of two attempts. Note that even if the stick breaks in the process, you could still just order a new one and replace it, as shown in Method 10. So there is merit in trying to do this method.
Disassemble the controller as shown in method 9, and remove the stick as shown in method 10. With the stick in hand, examine the four sides, and you’ll see many hinges holding it together. Start prying those hinges, little by little, in small increments. Note that the main problem here is that those hinges are fragile. They can tear off easily. Keep attempting to get separation.
As you pry it open, make sure the silver metal part is facing up and the black plastic part is facing down. Keep it that way as you open the whole thing. Note that you may have another version of the stick, but the same principle is applied.
There’s a spring inside that’s probably going to fall out, and you can just put that aside for now. With it open, continue to keep the black part facing down. There are tiny parts inside that can fall out, and it’s a pain to get them back in, but not impossible.
You may want to take a photo with your phone before they fall out. That way, you know how they go back in. There are three black pads. Clean them with isopropyl alcohol. Also, clean out any other debris you see inside.
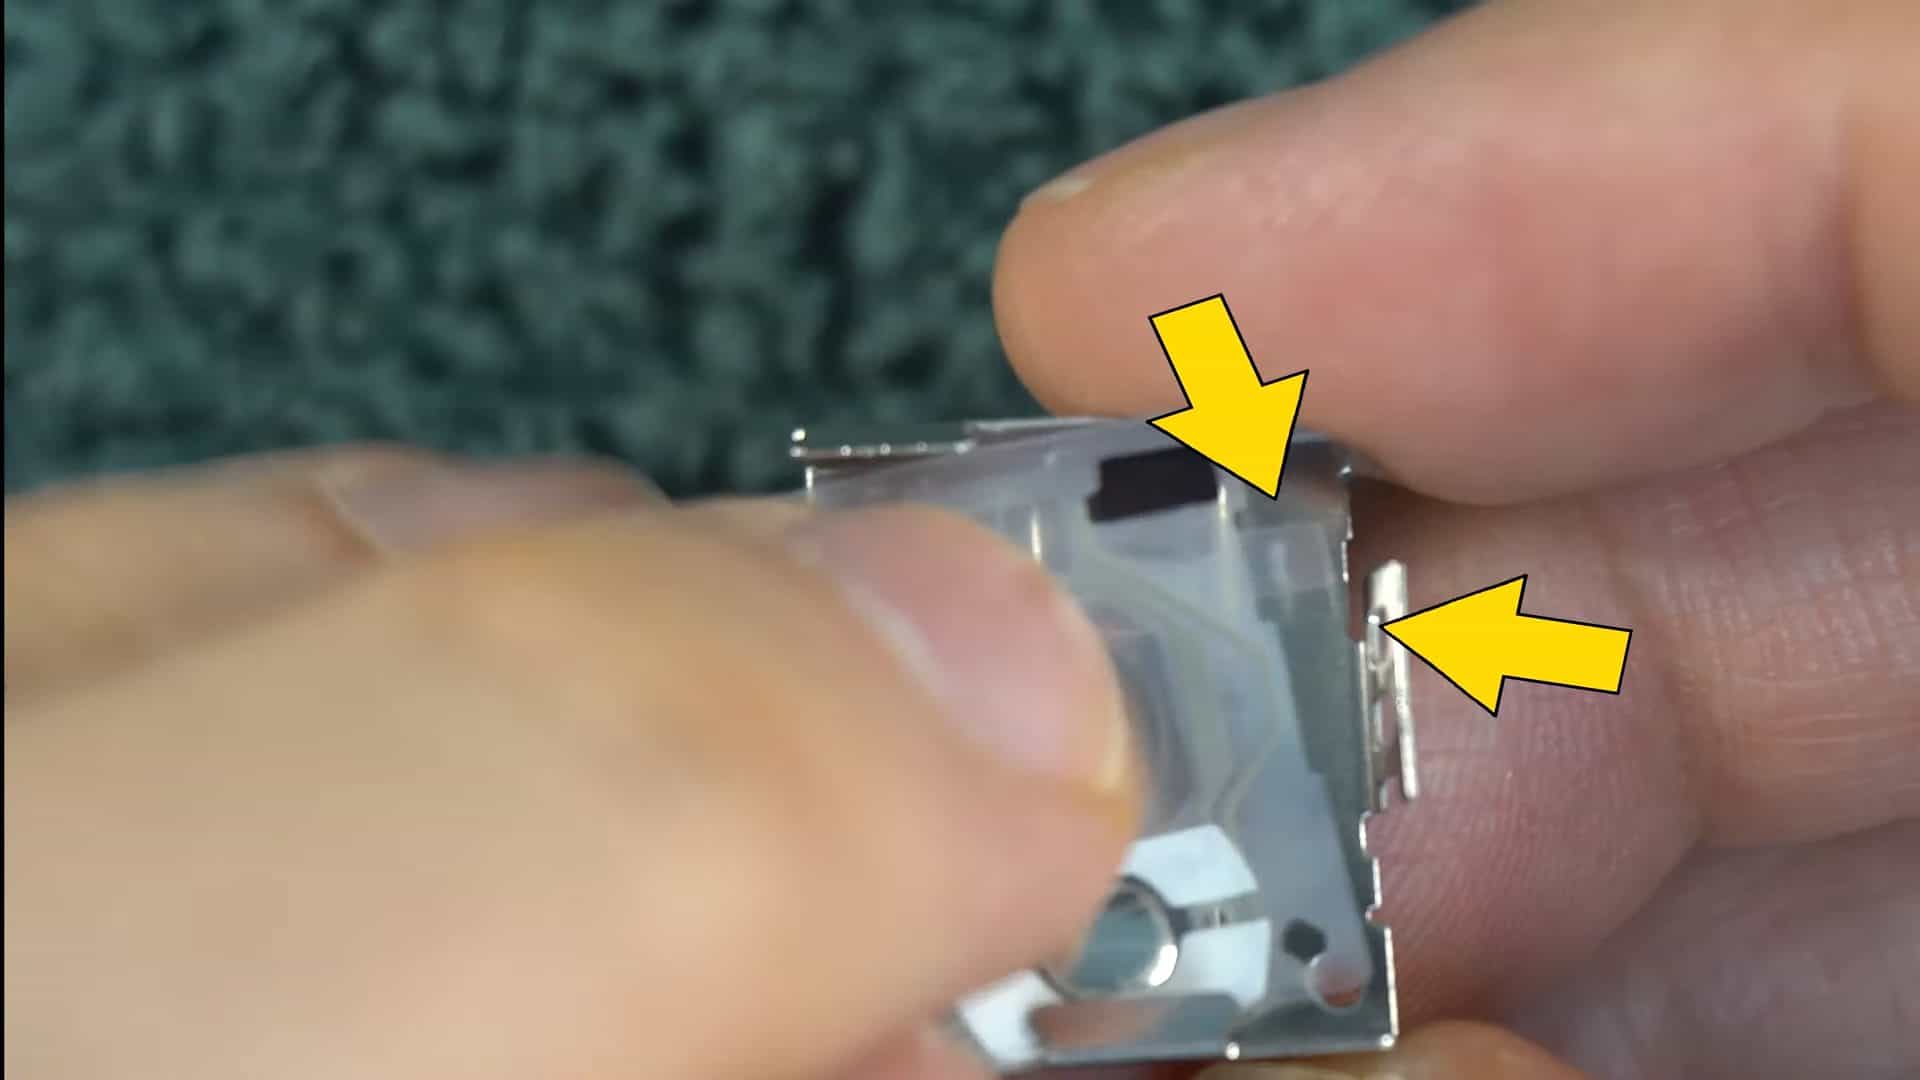
Now comes the hardest part of this tutorial, putting the two halves back together. The membrane that you cleaned probably fell out. Getting it back into place is tricky. There’s a small notch that needs to go underneath this hinge here (shown in the image above).
Make sure you don’t have the membrane facing down. The three black pads need to face up. Put the spring into place. The larger end of it needs to be sitting on the black side.
Then squeeze the two pieces back together, making sure the metal hinges line up with the proper indentations on the black plastic side. On my original try, I broke off two of these metal hinges, and that was enough to keep them from going back together. It’s possible you may break one but still be able to make it go back together. You could possibly put some tape to hold it together.
The second attempt I made on another stick was successful. There’s still a little bit of separation, but it worked 100% when I put it back in the Joy-Con and tested it. If you can get it closed, reinsert it into the Joy-Con and put everything back together as described in the previous methods.
Try Alternative Controllers
If your old/new Switch controller has begun to drift, it might be time to buy a new one. In order to help you avoid the bad Joy-Con Drift, we’ve compiled a list of the top Switch controllers for this section.
Switch Pro Wireless Controller
If you’re looking for something a little more advanced than the Joy-Cons, this is your best option. Longer gaming sessions shouldn’t be a problem at all because it feels far more comfortable in the hands than the Joy-Cons do and has a decent 40-hour battery life. Additionally, it has a sleek black style that is ideal if you want a little more of that N64 vibe.
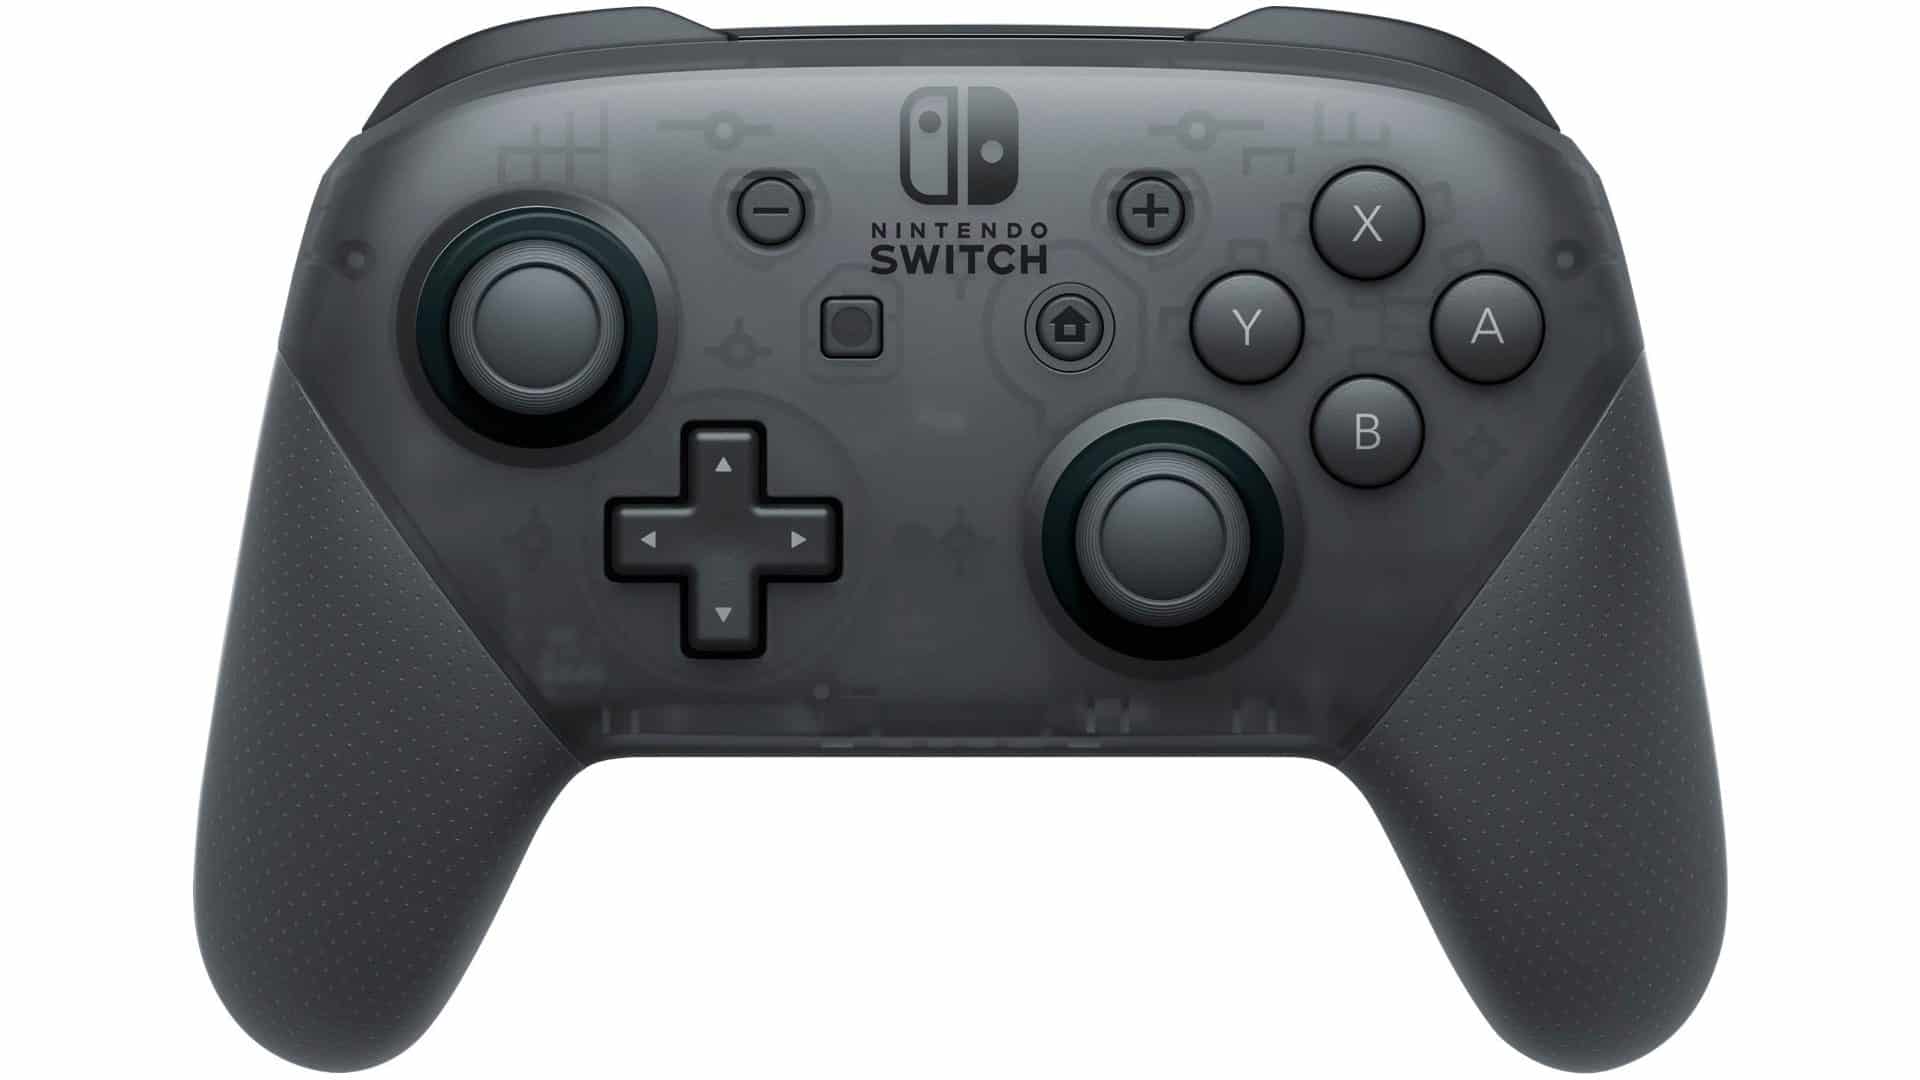
This is one of Nintendo’s approved Joy-Con alternatives, so it’s likely to be popular with most fans, and there won’t be any compatibility problems. While maintaining the motion control capabilities of the Joy-Con, it works flawlessly with the great majority of Switch titles.
Afterglow Wireless Deluxe Controller
The style of this controller is similar to the transparent plastic versions of the vintage Game Boy Color as well as Nintendo 64 controllers, but the Afterglow goes one step further. You’ll find LED lights inside its stylish case that can be customized to shine in various colors, offering you RGB-style customization to better suit your gaming room (or your mood).
It has wireless functionality in addition to having an inbuilt rechargeable battery, as many other Switch controllers do. Additionally, it has double programmable back buttons inside the paddle form that you can utilize whichever best matches your playing style.
PowerA Enhanced Wireless Controller
The only difference between this controller and the ordinary Switch Pro is that it has three additional buttons on the rear for additional button mapping. Additionally, it has a 30-hour rechargeable internal battery. Additionally, it has been ergonomically created to be as comfy as possible for your hands while also being less likely to send your game character racing off to meet their death.
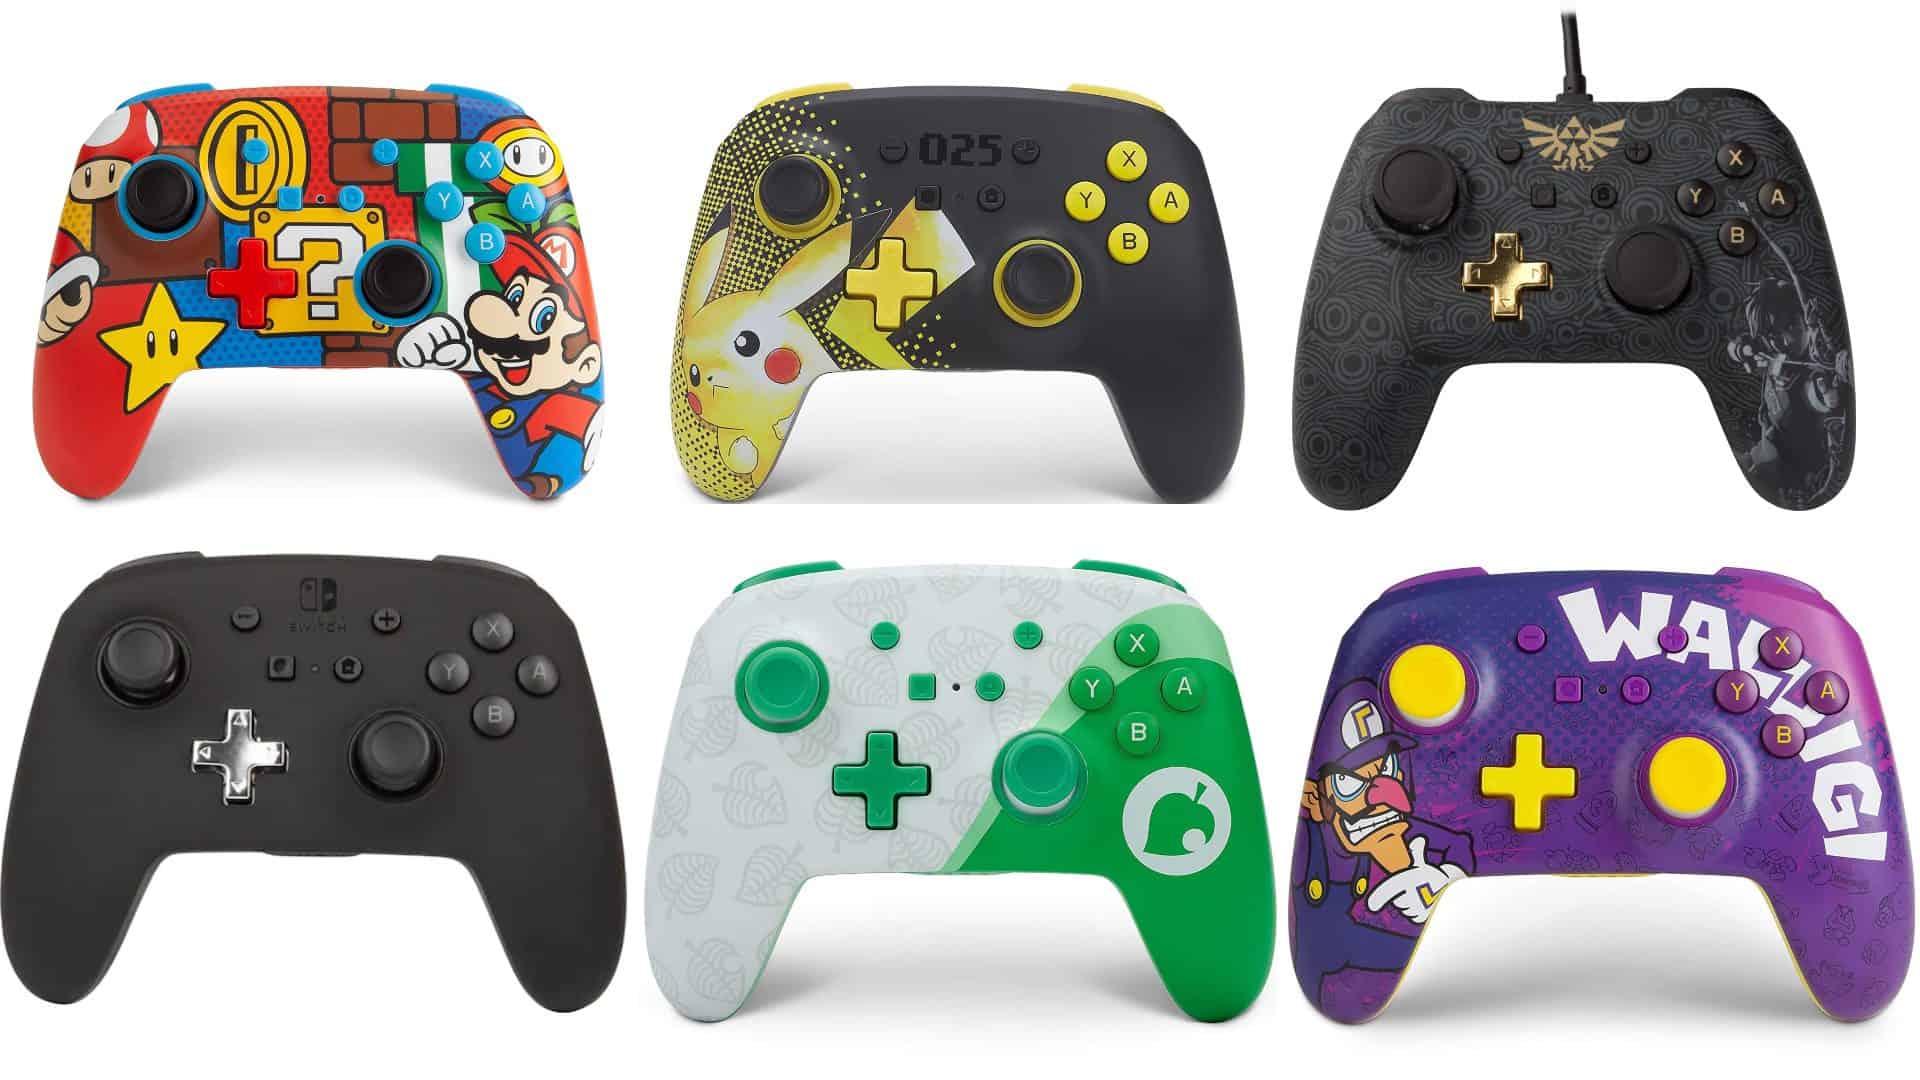
The wide range of styles that are available for this controller is another feature that will appeal especially to Nintendo fans.
Two of them include graphics from The Legend of Zelda, while others include an Amazon-only design with colorful Super Mario graphics, an adorable Animal Crossing design, as well as a Waluigi controller. If you wish to completely eliminate the need for recharging, there are other wired alternatives available.
The PowerA Spectra, which is excellent for usage in Super Smash Bros., Features LED lights that you can adjust between colors. You can also find even more unique controller themes, such as Crash Bandicoot.
Switch GameCube Controller
The GameCube controller is regarded as one of the best ever by many seasoned Nintendo players. The good news is that GameCube controllers are sort of compatible with the Nintendo Switch if you still have any lying around. All you need to do is purchase an adaptor, which is not too expensive.
What if you do not have any vintage GameCube controllers but still want to give them a shot? Not to worry. There are a number of new GameCube controllers available that have been created expressly to be used with the Nintendo Switch; they even feature wireless capabilities and a few additional buttons to make them more compatible with the more recent console.
These are available in all the traditional color schemes, along with a hip new Mario one and Pokémon fans’ favorite Pikachu, Umbreon, and Espeon-themed controllers.
Retro-Bit 64 Tribute Controller
Do you like playing N64 games on the Nintendo Switch online? Isn’t Banjo-Kazooie a fantastic game? Yeah, well, maybe not if you have to climb a tree in Click Clock Wood while combating Switch drift.
Because it was created for people with two hands instead of the three-handed aliens who’ve been supposedly this intended market for the original N64 controller, these Retro-Bit 64 Tribute controllers are basically an improved version of that device.
It’s important to note that even though this wireless controller isn’t a Nintendo creation, it does come with a convenient USB receiver that enables operation with the Switch. It also has an N64 port if you still have your Nintendo 64 and prefer to pull it out occasionally.


